Joseph Gorak
MSc Project: Web Application for Smart Home Deployment
Smart Floor Planner is a tool that allows for easy automated delopment of smart
homes through the Home Assistant software.
As Home Assistant requires some degree of programming knowledge for dashboard implementation, this makes it
hard for non tech-savy users to setup or deploy their smarthomes. More importantly, these smart homes can be
deployed for the purposes of assisting living. With this application, the user can upload an image of a
floorplan or design their own. From here, they can upload configuration files generated through Home Assitant
to add their
sensors inside the smart home directly to the application. These sensors can be placed and configured
accordingly which can in turn be exported and generate an interactive smart home dashboard without any user
programming required. The design allows for users to make floor plans anonyomously, or create an account
utilizing Firebase as the backend
for saving and loading floor plan data.
The design of the application was to be simplistic yet easy to learn. This would revolve in increasing
usability by utilizing practices
such as guiding the user towards intended design, implementing similar functions as other canvas-based
applications, and trying to make the controls
not very overwhelming. Other floor plan software are more advanced, offer 3D views, and have a high degree of
designability. The concept behind this project is
geared more towards uploading sensor from Home Assistant to configure them and generate dashboards to monitor
homes for assisted living. It is flexible enough to where users
can draw their floor plan in whichever software they are comfortable with and upload an image of this floor
plan. An example floor plan can be seen below.
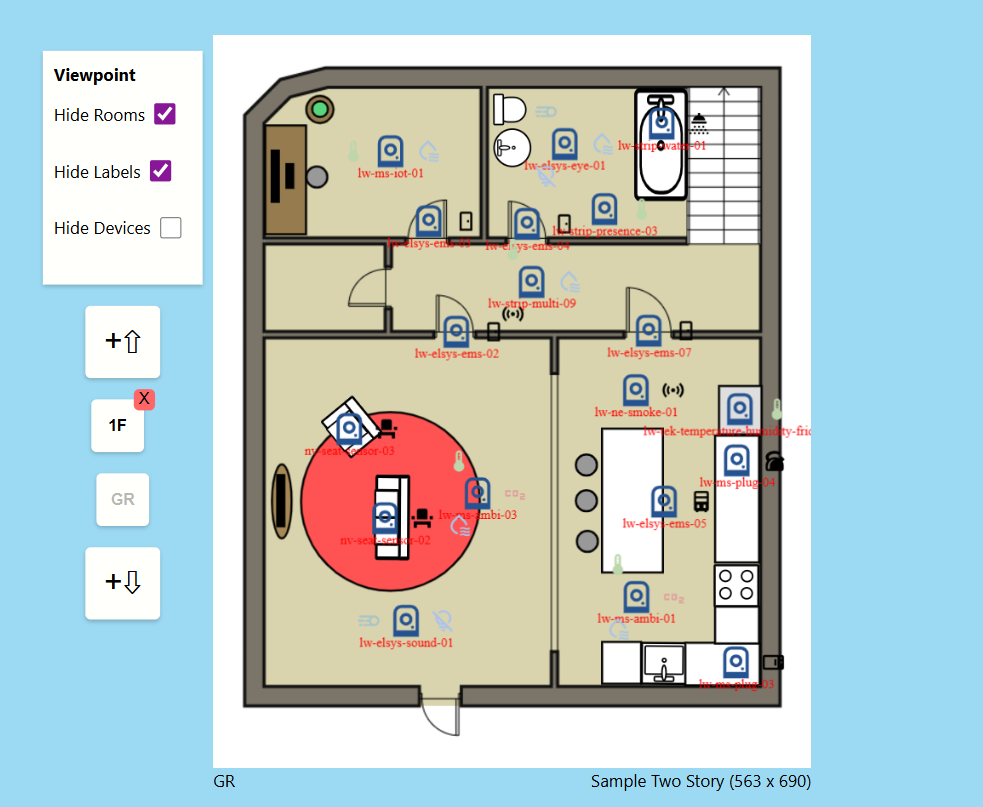
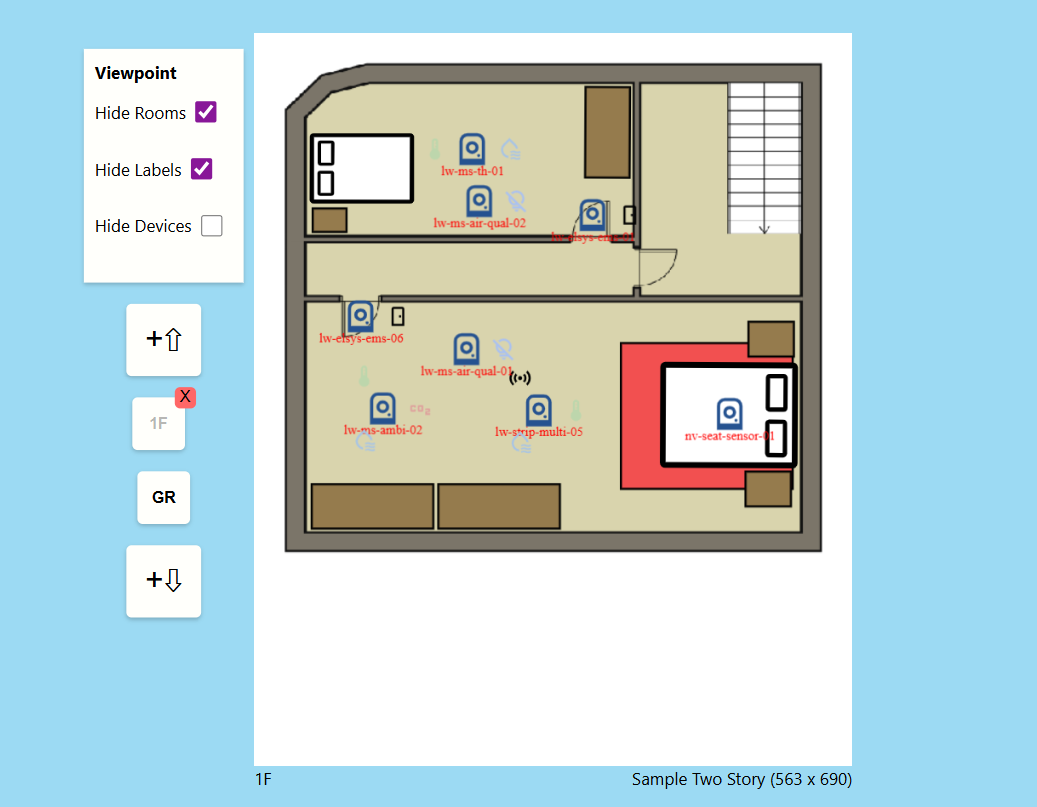
A simple use case of this scenario, as seen above, would be uploading images for floor plans. Users can have a maximum of five floors with each floor being its own floorplan. For the example, a ground floor and first floor were drawn and uploaded into the application as a blank slate. From here, rooms can be marked in order to create area listings in Home Assistant. This is done by utilizing the mark feature and tracing each room, labeling them. Furniture is added as a way to create familiarity between the user and the floor plan. It is easier to recognize rooms with common furniture found in them. As seen in the example, there are various icons depicting sensors. These are devices that were integrated into Home Assistant and then uploaded into Smart Floor Planner. Devices can be placed in locations corresponding to the real counterparts.
Devices and Data
As the highlight of the application are the devices, a lot of thought went into the concept. At the moment,
the application can only take
LoRaWAN devices integrated through TheThingsNetwork and ZigBee devices integrated through Home Assistant.
Users can take the core entity and device
configuration files from Home Assistant and load them into the application, which generates an object list of
placeable components. When clicking on device to
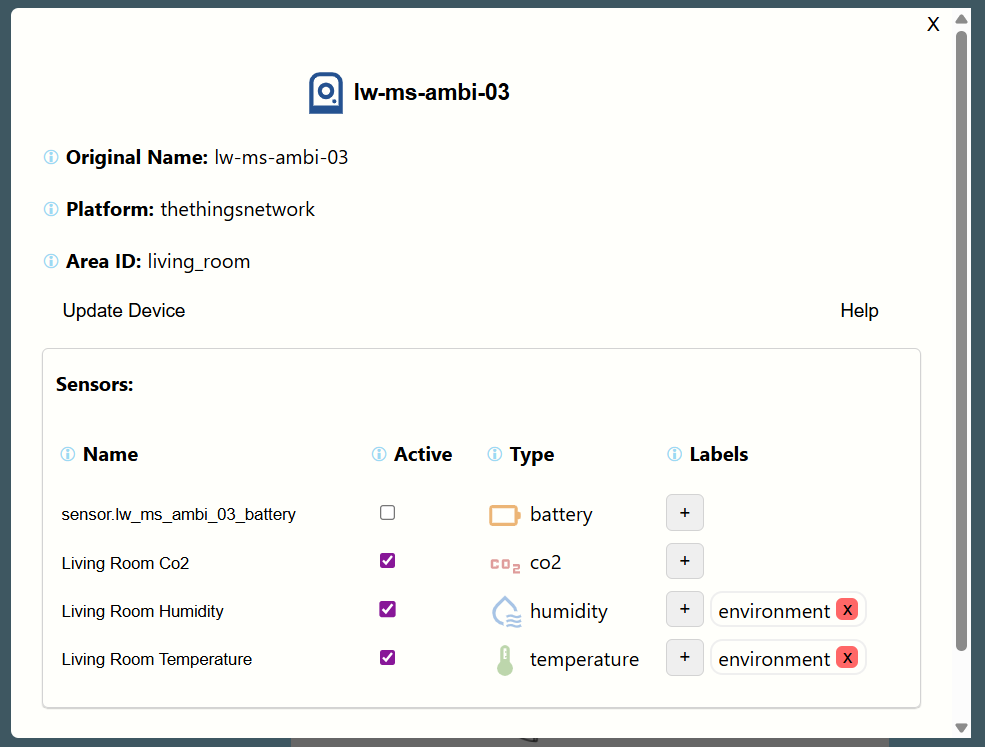
add it to the canvas, the user is met with a configuration menu as seen below.
This menu shows general device information and information for each individual entity, or sensor. The area
id
is calculated by checking the device's location
in relation to the marked room it is placed in. This area id allows for Home Asisstant to know which area each
device is intregrated within, as well as aids in the data exportation
process by allowing for room-specific dashboards. Certain devices may have many sensors implemented within
them, but the user may
only wish to use a handful of the available sensors. By setting the entity as active, this tells the
application which sensors
will be the targets for generating dashboards. The type of sensor states what data it receives. Certain
sensors, such as current sensors,
allow for further customization by giving the user an option to change to an appliance that the sensor may be
monitoring. Lastly, the labels allow for
target data monitoring. If labeled activity, scripts can take the duration of each sensor labeled activity to
give a comprehensive activity history.
Generating Home Assistant Dashboards
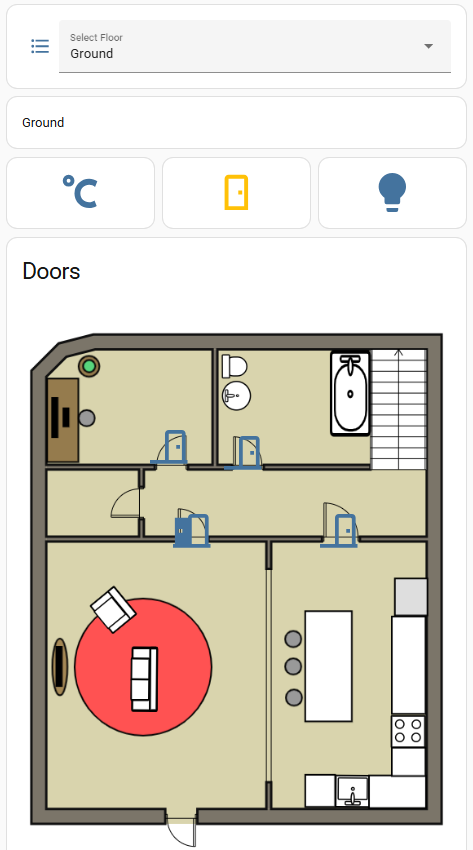
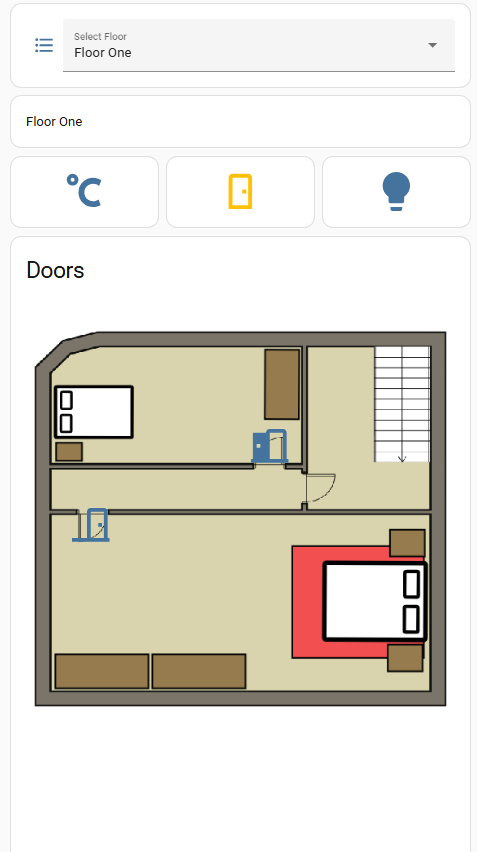
Once the user is done marking rooms, configurating devices, and allocated the sensors to the proper locations, they can export the data back into Home Assistant. This will generate various configuration files from the canvas and device data that are relevant for setting up the Home Assistant project. Dashboards are generated by looping through lists of rooms and sensor types to create objects that are converted into JSON format compatible with the target software. An example of a generated dashboard from the above demonstration can be seen below. It is a simple overview of each floor showing door, light, and temperature data. This would allow for monitoring of homes to see where individuals may be and for how long they spend in each room. As it may also be used for those with Dementia, routines can be logged through data so carers or family can see if the daily routines are met in order to dictate how much time should be spent towards care or spending time together. This floorplan dashboard is a general overview, and more detailed dashboards are generated as seen next.
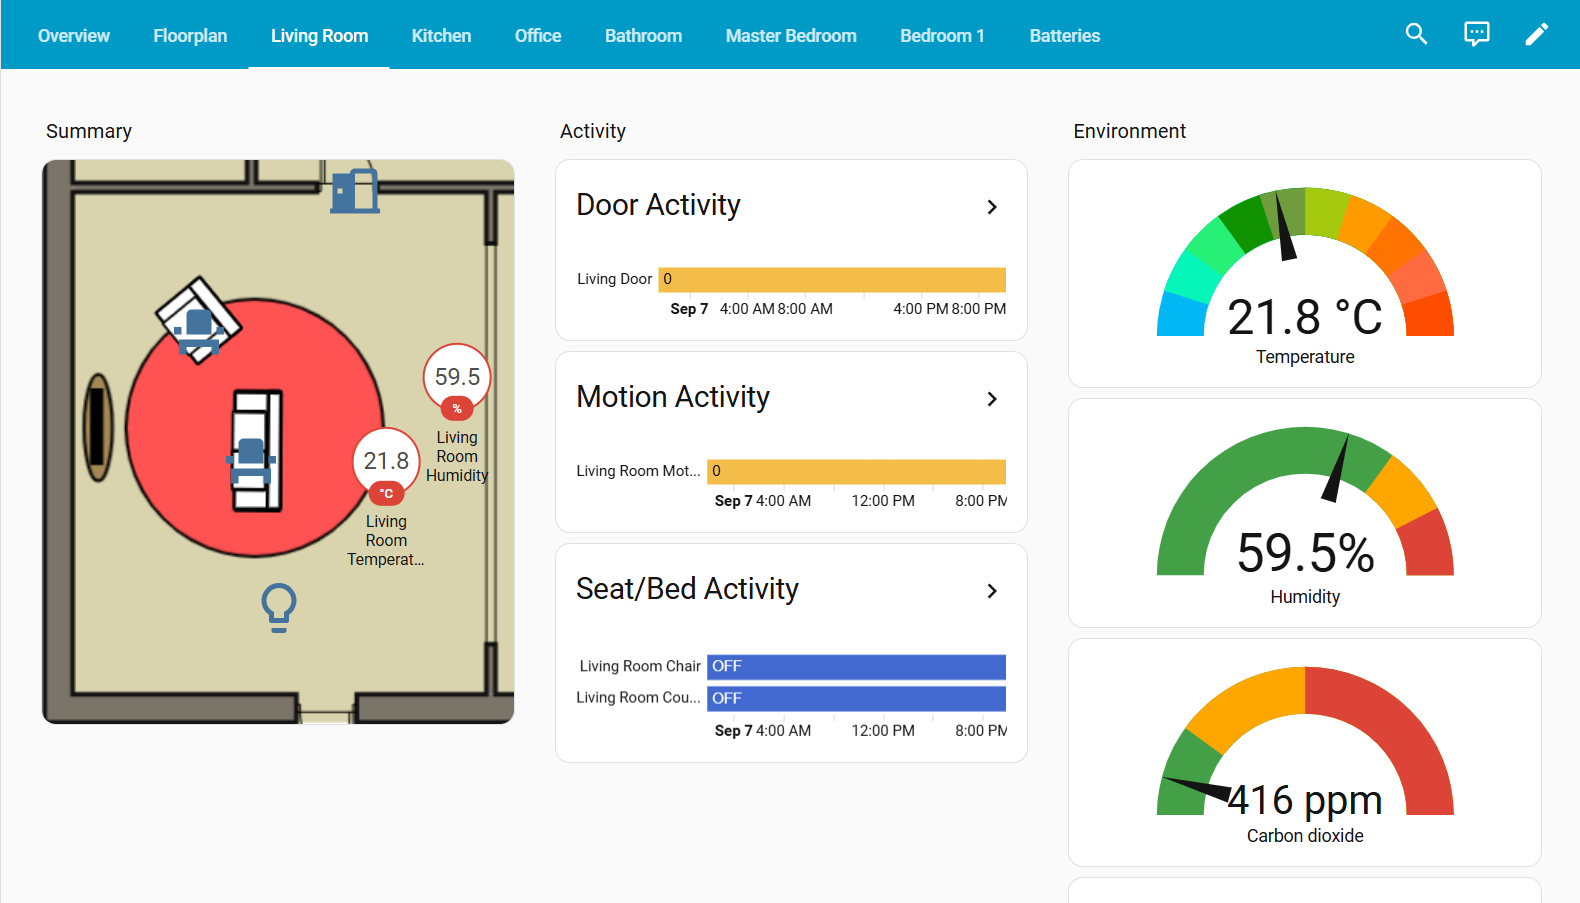
A more in-depth dashboard can be generated for each room in the floor plan as seen below. There are more room visuals with icons that can show active appliances, motion, humidity, temperature, and many more. There are also activity and environment cards generated to track history and the state of the room. This allows for further monitoring for more detailed history. At a glance, it is possible to see when temperatures are too hot or cold, humidity is high, as well as prolonged activity history. In a general overview dashboard, it will also trigger warning messages for instances such as the individual spends too long in the bathroom. This is helpful for cases where they may have collapsed and can allow for checking in. There is also a battery dashboard for checking the battery life of each device that records battery in the integration.
Lessons Learned
This web application is the biggest project I've undergone this far in my career. It gave me a wonderful
opportunity to create an application
that may be used for the automated deployment of smart homes for assisted living which could improve the lives
of those in need of care. A lot of the technology
used for development are langauges I have not had a chance to get as in-depth with thus I was able to learn a
lot. A highlight for this application would be working with
Fabric.js for the canvas logic, writing unit tests through Jest, and utilizing React states and logic for a
dynamic, interactive application.
In hindsight, there is a lot I would approach differently if I were to redo the project. I would spend
more time creating stronger logic flows
and utilize React states to their highest potential. A lot of it was new to me when I first began development,
so I found myself occasionally changing old logic and structure later down the line. There was a strict
deadline, so I wish I was
able to structure my code for unit testing more appropriately. I have not written unit tests in React before,
so I was not prepared for creating a proper testing environment.
This has lead a lot of time near the end of the project to be dedicated towards separating logic into the
proper format for testing. I also learned a lot about utilizing objects for separating variables
for passing towards child components and in general improving readability for the application. I was also able
to create a few algorithms
such as an entity relocating algorithm that would place overlapping entities in unused locations in the room
dashboards in order for a more clear data visualization.
Skills Learned:
- Agile methodologies: scrum approach of weekly stories and checkins with the project supervisro
- Working with JavaScript and canvases
- Utilizing React states, use effects, and dynamic user interactability
- Data and object manipulation and JSON data exportation
- Firebase hosting, authentication, security rules, and firestore queries
- Implementing hybrid testing through Jest unit-tests, manual testing, and user testing
- Improving applications based on user-feedback for bug fixing and implementing commonly sought after controls
- Project planning for creating user-centered web applications